Moshi Monster Katsuma birthday cake!

OK, I’m feeling pretty proud of myself this year. After last years Hello Kitty cake I decided I would finally take the next step into making a shaped cake rather than just decorate a square one with icing. I was not sure I could pull it off but to amazement I did! Go me 🙂

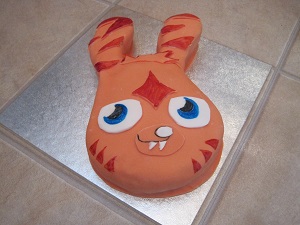
Moshi Monster Katsuma Birthday Cake

Moshi Monster Katsuma Birthday Cake. Done.

A good friend of mine – who really should be on the Great British Bakeoff gave me a recipe for a red velvet cake – which to be honest I’d never heard of.

But since all the cakes I’ve ever tasted from her have been without doubt the scrummiest I’ve ever had – how could I go wrong?

Well I did a bit. I kind of started baking without having all the ingredients…who hasn’t got a tub of cocoa powder right at the back of the cupboard? (well me it turns out). So red velvet chocolate cake turned into white velvet but happily that was way more than OK in the taste department!

The Katsuma birthday cake recipe

Anyhow, here is the altered recipe for what I term ‘white velvet’ cake:
60g unsalted butter
150g golden caster sugar
170g plain flour
1 egg
120ml buttermilk
1 and a half tsp white wine vinegar
Half tsp bicarbonate of soda
Half tsp vanilla extract

If you want to make the chocolate ‘red velvet’ version substitute 20g of flour for cocoa powder and add a dollop of red food colouring paste.

Unfortunately the cake mixture itself tastes pretty rubbish so no licking out the bowl I’m afraid!

Bung it in the oven at 200 degrees til its cooked. Test by sticking a skewer in the middle and when it comes out clean its done. To be honest I have no idea how long I actually cooked it for.

Putting Katsuma together

Moshi Monster Katsuma Birthday Cake

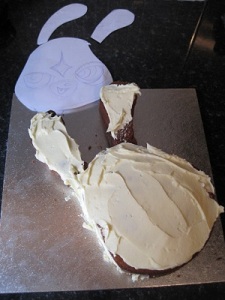
Use butter icing all over

So, get yourself a picture of Katsuma from the internet, I just googled Katsuma and looked at images to chose the one I liked the best.

I then drew it onto paper – making sure it fit the cake board I had – then cut it out, separating the ears from the face. I baked two cakes, a rectangle for one and the other for the ears in a loaf tin.

Let the cakes cool right down before cutting to shape. I used a medium length, serrated knife to cut them (I seemed to make less mess with crumbs that way).

Arrange on the cake board and cover in butter icing.


Moshi Monster Katsuma Birthday Cake

Lay orange fondant icing over the face

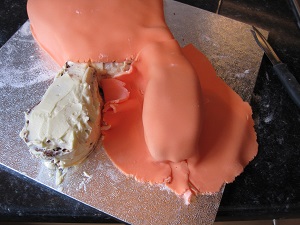
Then roll out a 250g block of orange fondant icing to about 4mm thick (make sure you have it big enough to lay over the entire face). Push it onto the cake gently using your hands and trim the edge with a sharp knife.

Moshi Monster Katsuma Birthday Cake

Lay icing over one ear

Next do the same for the ears, its a bit trickier going round them though.

Moshi Monster Katsuma Birthday Cake

Making the nose and mouth

Use some of the icing offcuts to make the nose and mouth and used a black icing pen for the detail.

Moshi Monster Katsuma Birthday Cake

Use the paint on the ears

Moshi Monster Katsuma Birthday Cake

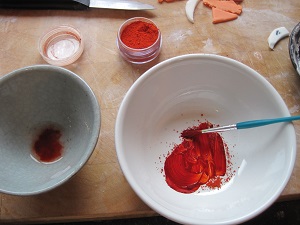
Use powder colour with a bit of alcohol to paint with

I also used some offcuts for Katsuma’s stripes and then painted them with a darker orange. I used blood orange colouring powder, using a tiny splash of vodka to make it into a liquid. Water won’t work.

I then painted them with a normal paint brush. You don’t need to use the offcuts aswell but I felt it gave more definition to the stripes.

Moshi Monster Katsuma Birthday Cake

Use white fondant for the eyes

I used white fondant icing and a blue food colouring gel pen for the eyes.

Katsuma Birthday Cake

The lovely Sophie – aged 6

And that’s it, enjoy the smiles of your adoring fans…

For the decoration you will need:

  • Butter icing
  • 1 black icing pen
  • 1 blue food colouring gel pen
  • 500g block of orange fondant icing
  • Small block of white fondant icing
  • Blood orange food colouring powder
Posted in Birthday Cake Decorating | Tagged , , , , , | Leave a comment

Hello Kitty Birthday Cake

So it’s was my little ones birthday this week and she asked for a Hello Kitty cake, now I know I could have just bought one but I thought I’d give it a go myself, probably easier than the Ben and Holly’s Little Kingdom or Woody from Toy Story that she wanted last year!

While I was making it I thought I’d take some photos so I could write a step by step of what I did, for those other mums out there who might not be great cake decorators but who are willing to give something a go….

OK so make your cake, I doubled the Be-Ro Victoria sandwich recipe to fill a rectangular 20 x 22cm cake tin:
•    8oz Butter – beat with sugar
•    8oz Sugar
•    8oz Flour – add with eggs
•    4 eggs – mix

And bingo, pop in oven at 180 degrees for 20 mins. I then iced it with butter icing (mix 4oz butter with 8oz icing sugar and a splash of vanilla essence).

Now for the Hello Kitty face…

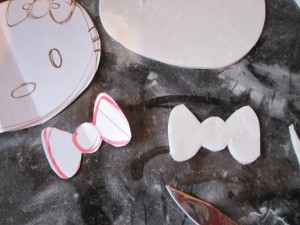
Get an image of Hello Kitty from the internet, insert the image into a Word doc and increase the size of the picture so the face will fit your cake tin. Alternatively it’s fairly easy to draw a Hello Kitty face yourself, which is what I did by looking at my daughters Hello Kitty soft toy. Print or draw the picture and cut it out. Do the same for her bow.

Hello Kitty Cake DecoratingHello Kitty Cake DecoratingHello Kitty Cake Decorating

Hello Kitty Cake DecoratingHello Kitty Cake Decorating

Hello Kitty Cake Decorating

Age 5 – Hello Kitty Cake

Toy Story Cake Decorating

Age 4 – Toy Story Cake

Ben and Holly Cake Decorating

Age 3 – Ben & Holly’s Magic Kingdom Cake

Peppa Pig Cake Decorating

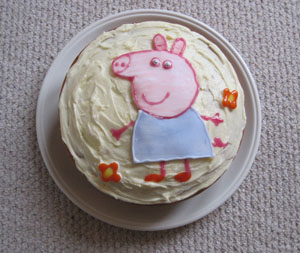
Age 2 – Peppa Pig Cake

Roll out some ready to roll white icing to about 5mm thick. Place the templates on the icing and cut out. Easy – now you have the face and her bow.

You’ll need some coloured icing pens next. Carefully use the icing pens to draw her nose (yellow), eyes and whiskers (black). For her bow you’ll need some red food colour gel (the gel gives a much brighter red colour than painting with food colouring). I used a new eye makeup applicator to paint with (or use a new small soft paintbrush) then I outlined with a black icing pen.

Tip: I found that the black icing on her whiskers that went onto the butter icing bled into the icing a bit when left overnight so maybe do this bit last minute if you can.

I didn’t have time to pipe some butter icing around the edge of the cake but that would have looked nice to finish it off. Still everyone enjoyed it!

Here’s some pics of my efforts over the years. I did them all the same way by using a picture to create a template and then use ready to roll icing and some food colouring to ‘paint’ and icing pens to create the detail.

Don’t even ask about her 1st birthday cake it was a disaster 🙂

Posted in Birthday Cake Decorating | Tagged , , , , , , , , | 2 Comments

Halloween Party Fun!

We’ve just discovered Pinterest and as ‘visual’ people we’re really excited about it! So we thought we’d create a Halloween Party Ideas board since that spooky time of year is just around the corner.

In the meantime here’s how we got on last year – maybe it will help you with your plans for this year’s party!

Halloween Ghost Hunt

Without doubt the Halloween ghost hunt is a must, but I would say that! Seriously though it really is the ideal way to get everyone started. Last year we got 5 mums to join in, each hid a treasure marker at their house and we set the ghost hunters off to the first house. When they found the next clue they also did a party game too. Eventually everyone ended up at Jill’s house for some Maggott stew (beef stew with rice between you and me) a fabulous warming end to a chilly night!

Here’s some of the things we got up to:

Pin the Skull on the Skeleton

At the first house we fixed our pin the skull on the skeleton game to a child’s easel and got all the kids to have a turn sticking the skull on. We just used some blu-tac to make it easier (and safer than using a pin). Making sure there was no peeking through the blindfold of course.

Halloween Party GamesMummy Wrap Competition

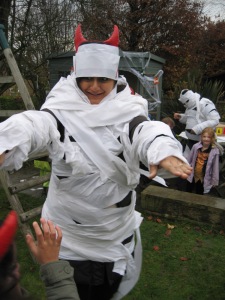
This was hilarious, we gave each family a toilet roll (a cheap one!) and challenged them to wrap someone in toilet roll until they look like an Egyptian Mummy.

Ghostly Stepping Stones

Next, we used our printed Halloween stepping stones game (which is basically an updated/themed version of musical chairs). Then we put on some spooky music (Ghost Town by the Specials, the Addams Family theme – anything like that works well). When the music stopped the kids had to stand on a stone and whoever wasn’t on a stone was out, until there was a winner.

Halloween Party GameBiscuit biting contest

We suspended some gingerbread men from a tree branch with string and with their hands behind their backs, everyone had to try and eat their biscuit off the string before their components.

Body parts guessing game

This game is easy to make and lots of fun, Just get a large box and cut out some hand holes. Place 6 bowls inside the box and fill with body parts – or stuff that feels like body parts!! We used:

  1. Hair (an old wig)
  2. Guts (cooked, cold spaghetti)
  3. Eye balls (a tin of lychee floating in water)
  4. Congealed blood (mashed up strawberry jelly)
  5. Finger bones (a packet of twigglets)
  6. Toe nails (parmesan shavings).

Maybe you can make up a few more – and then tell us feedback@lelloandmonkey.co.uk

Don’t forget to visit our Halloween party games page!

Posted in Halloween Party Games | Tagged , , , , , , | 1 Comment

Starwars Party

Boys will be boys and my soon to be 5 year old son, who is mad about ‘Lego Star Wars’ has requested a Star Wars Party this year.  My first thought was to hire some entertainers, knowing little about Star Wars myself and not wanting to disappoint, as I had recently with my failure to tell the difference between Boba Fett and Jango Fett in a Lego Star Wars battle.  However, after giving it some thought the ideas started flowing and if I run out of steam, I’ll simply use the force!

Make some name stickers, each featuring 1 of 4 chosen characters. These will help you to divide guests into groups. You will need equal quantity of characters (depending on how many groups you want (4 groups of 6 is ideal). I like to use a mixture of heroes and villains e.g. Yoda, Leia, Darth Vader, Clone Trooper. Hand these out as guests arrive.

Use the force on Vader

This game is like ‘Pin the Tail on the Donkey’, but much more fun for Star Wars fans. Pin a poster of Darth Vader on the wall on top of a large dust sheet. Divide guests into teams (using their badges) and blindfold the first team member. Give them the tin of silly string (use a different colour of string for each team), spin them round once and give them a 3 second blast at Darth Vader!  The winning team will have done the most damage to the evil villain.

Make your own Light Sabre

Chunky glow sticks make great mini light sabres and at 30p each they wont break the bank. A 7 cm length of grey plumbing pipe makes a good handle and a green and red sticker dot will make your on and off switch. Here’s where we bought our light sticks.

Jedi Training

Once guests have made their light sabres they will want to use them, so space children out in the room and play the game ‘Yoda Says’, which is essentially ‘Simon Says’ in Star Wars theme. Yoda says instructions like: Activate sabers, ready for battle, Darth Vader pose or simply use the force high, low, to the left and to the right and the quicker you shout out the actions the more fun they will have!

Musical Meteor Dance

Replace the chairs in ‘musical chairs’ with space stones, to make this game fit your party theme. Draw 4 stones and stick a picture of each of your chosen characters in the centre of each stone, photocopy equal quantities of each design and make sure you have one for every guest. Lay them out in a circle for children to dance around and after each pause of the music guests must find a safe stone to stand on. After each turn remove a stone to eliminate a child from the game. Sweeten the blow by asking eliminated guests to be your special helper and give them the job of choosing and removing the next stone. For large groups play this in pairs (you will also economise on stones).

Jedi Pod Racer Relay

Set out 4 different pairs of stepping stones at opposite ends of the room.  Divide party guests into their teams using their badges and ask them to stand in line behind their stone. Their mission is to become a pod racer and fly around their stone (situated at the opposite end of the room) and tag the next team member on their return until all team members have completed their mission and have landed safely at base. You can add extra stones along their route so that they have some obstacles to negotiate along the way.

Pass the Death Star

Pass the parcel in the form of a death star. Place the main present inside a cheap plastic ball to give you a death star shape and cover with layers of wrapping paper with a sweet in each layer. Make sure every guest has a turn and a sweet treat.

Star Wars Model Painting

Using a Star Wars shaker maker set pre-make Plaster of Paris moulds of Yoda and R2D2. Set the children up with aprons and acrylic paint and have some peaceful party time before guests sit down for their party food. You could make an extra Yoda and paint it gold, so that you have a trophy for the winning team.

MAY THE FORCE BE WITH YOU!

See our Star Wars Party Ideas pinterest board for more ideas!

Posted in kids birthday party planning, Star Wars Party Ideas | Tagged , , , , | Leave a comment

Halloween Party Games for Kids

The leaves are falling from the trees and the colours of autumn are upon us, so it’s time to start thinking about Halloween! This is an exciting time for kids who love the thrill of a good ghost story.  To make more of your Halloween why not organise a Halloween Party and make your little monsters work for those ‘treats’!

A great alternative to ‘trick or treating’ is to host a Halloween Ghost Hunt? All you need to do is get together with a few neighbours and ask them to hide some clues and spooky scenes their gardens, then set the ghost hunters off following clues, leading them back to your house, where the pumpkin holds their prize.  You can put on a few extra party games in your garden before home time!

We love Halloween party games and these are our tried and tested recommendations:

Pin the Skull on the skeleton

Kids of every age enjoy pin the tail on the donkey games and you can find lots of Halloween themed versions of this party classic. Our is called pin the skull on the skeleton.

Frighteningly Fruitastic Fun

Apple bobbing – there’s nothing better than doing the favourites, I loved apple bobbing as a child and its one that always gets everyone laughing and getting wet! Get yourself a large tub and fill with water and small apples. Make sure the kids put their hands behind their back and give them 3 chances to grab an apple with their teeth.

Hold an apple biting contest – Tie string around the apples and hang them from a tree branch with string. With their hands behind their backs each contestant has to try and eat their apple off the string before anyone else!

Mummy knows Best!

This game is a fantastic ice breaker and is great for families to do together. Give each family a roll of cheap white toilet paper. Tell them to choose who will be a ‘wrapper’ and who will be the ‘Mummy’. Set a time limit of 2 minutes for the wrappers to wind the toilet paper around the chosen ‘Mummy’ and judge the winner at the end! Great fun and a brilliant photo opportunity!

Pumpkin Pictionary

Write some Halloween words on a few pieces of paper, then fold them up and put in a pumpkin (Use words that are easy to illustrate e.g. Vampire, Ghost, Pumpkin, Witch, Coffin, Skeleton, Haunted House, Mummy, Graveyard Bat, Spider, Monster). Divide the party guests into 2 teams and then take it in turns to illustrate the word on their piece of paper. Make sure you note down the score so that you can determine the winning team!

Spooky Skittles

Lello and Monkey like to recycle so use the markers from your Halloween Ghost Hunt and stick each one to an empty bottle. Then just set them up like skittles and use a tennis ball to try to knock them all down. This Halloween party games is especially good for little ones!

We’ve made a few more suggestions for Halloween party games

Posted in Halloween Party Games | Tagged , , , | 1 Comment

Organising a Kids party at home

OK so you need to arrange a kids birthday party, where do you start?

Firstly don’t be daunted, all you need is a bit of organisation and preparation and trust me it will all be OK!

There a loads of checklists and party plans out there to help you and in time this blog will become a great resource too…but Rome wasn’t built in a day, so we’ll point you in the right direction for now.

Don’t be afraid to limit the number of kids your child can invite to the party, depending on the size of your home and the age of the kids of course, you probably won’t have the space for everyone in the class. A good rule of thumb for the number to invite is your child’s age plus one. Remember this is your child’s birthday – ask them to invite the children they enjoy playing with.

Send out your invites about 3 weeks before the party, be aware that if you are not inviting the whole class be subtle about handing out invitations. There are some free printable invitations for pirate, princess, animal and dinosaur themed partys in our ‘free printables‘ page. Don’t forget to include a map to the party venue and ask for mums to make it clear if their child has any allergies or special dietary requirements.

Setting the scene – theme it!

It’s much easier to make a birthday party come together if you have a theme. Give your child a few suggestions and ask them to choose, unless they already have an idea you can develop. Don’t be scared if your child asks for a character themed birthday that isn’t available in the shops, think outside the box a bit (a Charlie & Lola party could become a craft themed birthday, a Little Einsteins party could be musical themed, a Spongebob birthday party can be underwater themed and so on).

You can compliment the theme with music and decorations, either bought from the shop or if you’re feeling creative, make them yourself. Again we have created some printable party decorations and accessories to help the process.

Music

Every birthday party needs a bit of music. Don’t forget to take a CD player if you are holding the party a venue other than your home. There are lots of children’s compilation CDs about or you could make your own compilation of your child’s favourite music if you have the time. Children’s TV theme tunes are usually a safe bet, especially for under 5’s.

Decorate it!

You can help create an instant party atmosphere with balloons, banners, themed paper, tablecloths, paper plates and cups, party hats and so on.

Don’t be afraid to make a few decorations yourself, or even get your child to help in the week before, they’ll get quality time with you getting ‘crafty’ and it’ll help brighten up the room! Something simple like paper chains are great and so easy to make! If you’re doing a character themed party and you can’t buy suitable decorations to match in the shops, print off a few characters from the internet, cut them out and stick them to a homemade banner – easy!

There are loads of party suppliers online that sell party tableware, supplies and party decorations, browse a few to check out prices for ideas and budget.

Posted in kids birthday party planning | Tagged , , , , | Leave a comment

It’s a start!

We’ve been designing and developing great kids treasure hunts and themed kids party games for the last 3 years and we’ve come a long way since our first pirate treasure hunt launched in 2008. We’ve put a lot of effort into keeping things fresh and so created 7 more treasure hunts in the range including princess, animal, dinosaur, monster, halloween, easter and christmas hunts.

It all started as an idea to help mums and dads have affordable but exciting kids parties at home. Jill had made a pirate treasure hunt for her sons birthday and spent hours drawing and painting a pirate ship and treasure chest out of old cereal packets and loo rolls, real Blue Peter stuff! We just thought what a great idea to produce them for other parents too busy and maybe not as creative. And so Lello and Monkey was born…

As parents ourselves we know the pressures put on parents to host fantastic birthday parties for their kids, forced into spending huge amounts of money at soft play centres or hiring village hall venues so the kids can invite all their school friends. Lets face it, hosting a party at home is daunting if you don’t know where to start.

So we’ve started this blog site as a means of spreading the knowledge, tips, tricks, ideas, activities and games that will help mums and dads plan a magical party at home, whilst not spending the earth. Keep coming back we hope you’ll find something useful…

Posted in Lello and Monkey | Tagged , , , | Leave a comment